
Things to THINK about When Wiring Accessories…
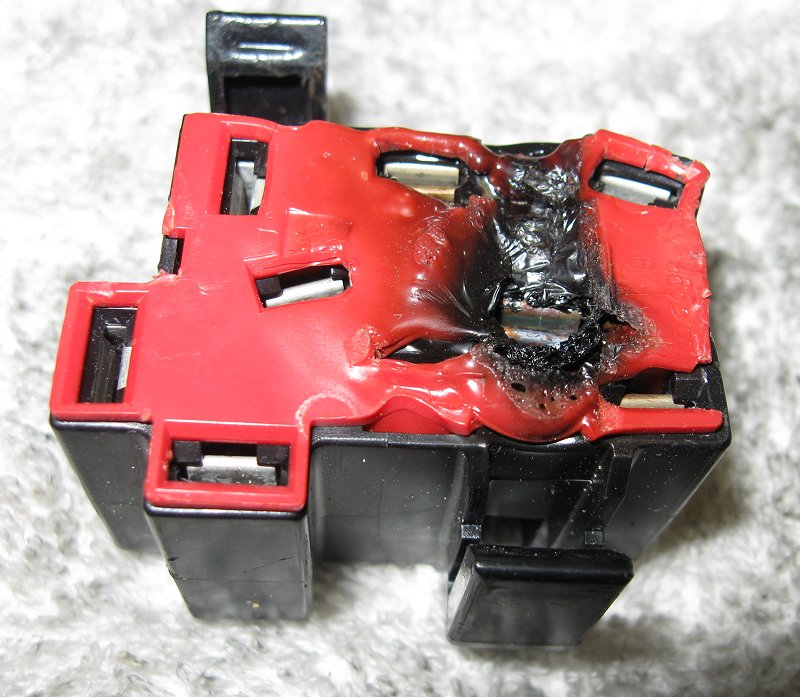
When wiring anything in your vehicle that draws heavy current such as high powered offroad lights or audio amplifiers, there are a few things to consider. Number one, make sure you use wire that is rated for the amperage that the accessories is going to pull. It is always better to have wire that is OVER rated rather than wire that is not rated high enough. If wire is used that is not rated to handle the current that your  accessory will pull, the result could be overheated wires that could melt the insulation or the electrical plugs found throughout your vehicle (see image below), causing a short or worse yet it could result in a fire. If you know how much current your accessory will draw you can determine what gauge wire is appropriate for your application.
Personally I like to use wire that far exceeds the current draw of my accessory. It’s overkill but in a few applications I’ve used heavy gauge stranded industrial wire with water and chemical resistant insulation. That way there is no question as to whether the wire is rated high enough or not. If this approach is taken, it is very wise to place a fuse at the battery end as close to the battery as possible. Most wire in a vehicle, if shorted out, will burn up before the battery overheats and possibly explodes. If wire that is over-rated for vehicle use is used and a short occurs, a short will most likely result in damage to the vehicle  of some sort unless a fuse is put in line as close to the battery as possible. With the fuse there, in the case of a dead short, the fuse will burn out first before any damage could occur.
Where to Get your Power

The second important thing to consider when adding accessories is to determine where you will get your power. Many people will consider tapping into the hot wire of an existing circuit using something called a T-tap or quick slide connector, which are designed specifically for tapping into an existing wire. This is not always a good idea for several reasons. First and foremost, tapping into an existing circuit puts additional load on that circuit. The additional load placed on a circuit or wire may exceed the limits of those wires, connectors and fuse. 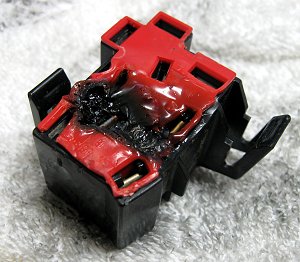 Overloading a circuit will do one of two things. First, it may blow a fuse. So people will sometimes place a larger fuse in the fuse block to handle the extra load on that circuit. BAD IDEA! The fuse may hold but the resulting extra current may be more that the wire is rated for creating heat that can melt wires and connectors and start fires! The connector to the right was overloaded and fused two adjacent terminals together, causing a short the blew the vehicles main fuse. Before the fuse blew the connector actually started to burn. The wire that carried the extra load also had melted its insulation and in places was exposed. Luckily for the owner of this vehicle, it did not result in a fire but in many cases it does.
A better idea….
With accessories that pull a lot of power it is always better to get your power directly from the batteries positive terminal rather than tapping into the existing fuse block or wiring harness. In most cases the vehicles existing fuse blocks, wires and connectors are not rated to handle the additional load of high powered accessories such as offroad lights and amplifiers. If you are the kind of person that likes to add all kind of goodies to your vehicle it might be worth installing an additional fuse block that handles non-critical items like offroad lights, CB radios, power inverters, audio equipment, etc. This additional block can then be powered by a heavy duty wire capable of carrying the current required of all the accessories on the block. Be sure to fuse the block at the battery.
Another important thing to consider is how you control the switching on/off of the power to your accessories. In almost every case where high current is required, the switch you will use to turn on the power should not handle the load because most switches are not designed to handle higher amps. The job of switching the power is better left to a relay. What is a relay? A relay is a device that, through a magnetic 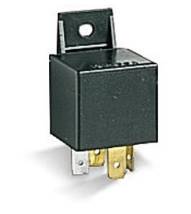 induction coil, turns on the power for you. The switch that is installed in the cab of your 4×4 actually only powers the relay itself which draws very little current. In most installations a 30 AMP relay from Radio Shack (Auto Relay Cat. Number 275-226) will do unless your amperage demands exceed 30 amps. I like to used a lighted switch in the cab to let me know if driving lights are on.
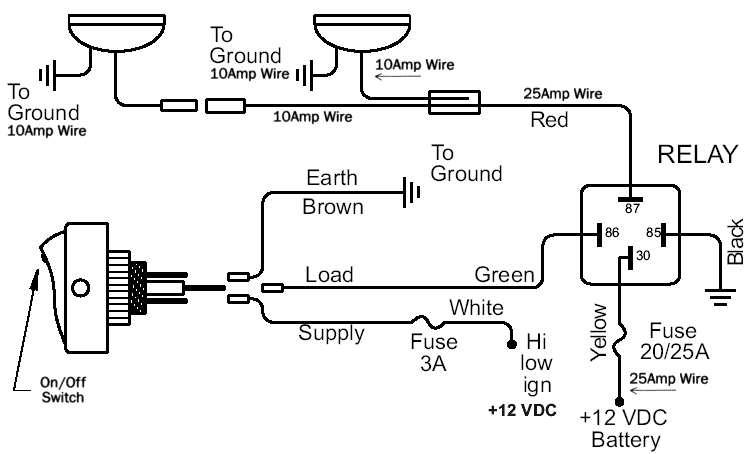
The method I use for wiring the lights and other external accessories, for the most part, follows the diagram pictured above. As in the diagram a wire is run from a 12 volt power source to the switch in the cab and out to the relay placing a fuse at the source of the power. (Follow the relay’s wiring schematic when connecting the wires to the relay) One of the relays terminals goes to ground. Then run a heavy gauge wire from the battery to the relay placing a 30 Amp fuse in line very close to the battery. Do not connect the power to the battery until all wiring is done. Then I run a single heavy gauge wire out to the lights or other accessory. If installing lights, split it into two leads at the lights. If you do this be sure the wire is rated to handle BOTH lights since it will carry the current of both. The diagram shows two leads  coming from the relay. Then I run the second wire of the lights or other accessory to a good ground on the frame of the vehicle. If the wires will not be soldered together and crimped connectors will be used it’s a good idea to put a dielectric paste on the connectors where they come in contact. This will prevent corrosion as time passes ensuring a good connection. Then double-checked all wiring before plugging in the power.
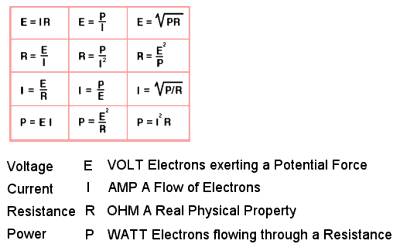
Ohms Law
Ohm’s Law Defined
Ohm’s Law defines the relationships between (P) power, (E) voltage, (I) current, and (R) resistance. One ohm is the resistance value through which one volt will maintain a current of one ampere.
( I ) Current is what flows on a wire or conductor. Current is measured in (A) amperes or amps.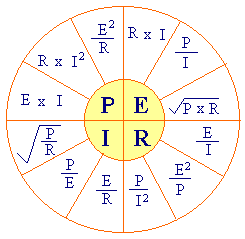
( E ) Voltage is the difference in electrical potential between two points in a circuit. It’s the push or pressure behind current flow through a circuit, and is measured in (V) volts.
( R ) Resistance determines how much current will flow through a component. Resistors are used to control voltage and current levels. The higher the resistance, the smaller the amount of current is allowed to flow. Resistance is measured in ohms.
( P ) Power is the amount of current times the voltage level at a given point measured in wattage or watts.
V = I x R
I = V / R
R = V / I
Alternative Offroad Lights or Accessory Wiring Diagram Using a Relay

Also see:
12 Volt Wiring Gauge Requirements at specific Amps for Automotive Electrical Systems
Automotive Wiring Tips – Using Relays
12 Volt Wiring Gauge Requirements at specific Amps for Automotive Electrical Systems
12 Volt Wiring – Distance and Amps to Gauge Chart
Converting Candlepower to Watts and vice-versa & Other Offroad Light Information
Automotive Wiring Tips & Techniques
HEI Ignition Installation and Review
Using LED lights in your Vehicle

I’ve been trying to read everything I can about using relays and switches so I can add lights, a winch switch and small air compressor to my JK. So far, of everything I’ve read this has easily been the clearest and most informative. This will be my how to guide in the garage for the next couple weeks. Thanks a ton.
Hi I’m trying to install train air horn in my f350 truck
Needed help on using a relay as you mentioned
Thanks
Thanks for the informative writeup. Awnsered a few questions I had about how to handle some high amp wiring for my lights.