
DEPARTMENT OF: Cheap Tricks & Useful Tips …
%#$@&!!*@ …and then a stream of obscenities followed…
 Inevitably it happens. You’re wrenching away, working hard at a project when the wrench slips under full torque and comes to an abrupt halt as it smacks into a cold hard piece of metal. The only problem is, your thumb was between that wrench and the immovable object it hit. ! Son of a #@&%*#! birfield joint, that hurts like a #%$@#%$!! The white flash of pain then subsides to a throbbing severe ache as the thumbnail begins to turn purple and the pressure builds under the nail. A few days pass and the pain subsides leaving behind a nail that looks like a purple Sharpie marker exploded on your thumb. As the weeks pass and your nail grows out, it becomes apparent that the nail is damaged and is separating. It gets caught on your cloths and bugs you because it just doesn’t feel right. You figure its going to take months to grow out and get back to normal. Well … there’s a fix for this nail that you probably already have in your workshop.
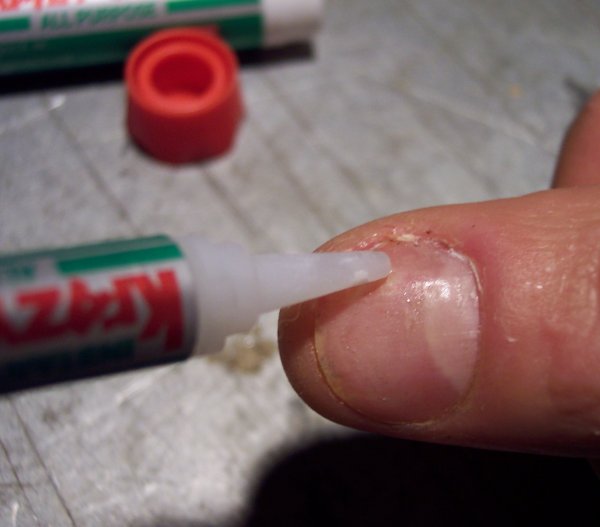
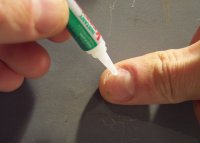
Superglue it! Yep that’s right. Did you ever glue your fingers together by accident? Well it works just as well on the finger nail and is super strong. The photo directly below is an actual photo of the smashed fingernail after it had been cleaned and treated with superglue. This is the same fingernail as the photo above about 15 minutes later.
Here’s what you do.
Clean the finger nail really good. Sometimes you can get the blood stains out if the nail is cracked to where the old blood is underneath. Then let it dry for a while. In order for the Superglue / Krazy Glue (or alternate/generic brand there of) to set up, the nail has to be very dry, but also clean. If you have rough spots or jagged edges, sand them down with some 220 fine grit sand paper or a nail file.
 Then start applying the super glue into the cracks, squeezing the air bubbles out and replace the gaps with super glue. Getting the air out will make the nail much stronger then if you trapped the air in the nail. If the nail is separated, try holding it together as the glue sets up (about 20 seconds) so it makes contact again. Careful not to glue your other fingers to the nail as it dries. Use a pencil point or a pin to hold the separated nail together. Let that dry before layering on any more super glue. It won’t take long to dry but don’t touch anything. Once dry, add more, filling in any gaps. If you layer on too much or need to shape it a little, the super glue is sandable as is your fingernail. So basically you can reshape, rebuild and strengthen your fingernail so it doesn’t bother you anymore. The glue dries to a clean or opaque appearance, just like the nail. As time goes on, if it needs more super glue, you can sand it down if necessary and add more.
I can tell you this works because I’m typing this with a rebuilt thumbnail that had basically cracked in half from one side to the other. As you can see in the super glue applying pictures, you can hardly tell it was a few short weeks ago a black and blue, blood blistered, irritating, cracked thumbnail. If you click on the picture directly above, you might be able to make out the faint area that makes up a large portion of the center of the thumbnail. That area is primarily superglue and it’s holding like a rock. So suffer no more. Super Glue it.
You may be able to prevent the nail from splitting by releasing the pressure early. Straighten out a fat paper-clip, heat the end until glowing and gently push it into the middle of the nail to release the blood from under it. You need to do this before the blood has had a chance to clot.
What’s up, yup this article is really pleasant and I have learned lot of things from it